How to Refurbish Wooden Oars for Your Fishing Boat
 This is for all you folks who love to float and fish.
I’ve slowly and stupidly been refinishing a wooden dory that was given to me since last summer. I’ve never done anything like it before and am findingthat it is a painstakingly slow process. I have also learned a great deal about wood in the process, some of which has to do with sanding and varnishing. There are many helpful tricks to make the process easier. If you’re the type of person who loves the way wooden oars row and or loves the way they look, it’s remarkably easy to bring back a beat-up pair to look almost new.
Here’s How:
1. Set up to work outdoors for sanding. During all steps of this process latex gloves and a respirator are recommended. Use blue painter’s tape to wrap around and protect handles and rope wraps.
2. Get a two or three sheets of both 60 and 120 grit sandpaper for each oar. You can use a variable speed orbital sander for the blades. Do not try and use this for the shaft as it will cause flat spots. Simply hand sand the shaft with the sand paper. All you’re doing here is removing the protective coating or varnish from the wood. Sand along with the grain of the wood (as much as you can) until the oar appears dull.
3. Blow sawdust off with canned air or compressor and clean with denatured alcohol.
4. Recover the rope wraps, handles or portions of the wooden oar you do not want stained with painter’s tape.
5. For the remainder of the process a indoor and as clean as possible a room will be needed.
If the room is dusty or dirty the varnish will show lots of dust particles once dry.
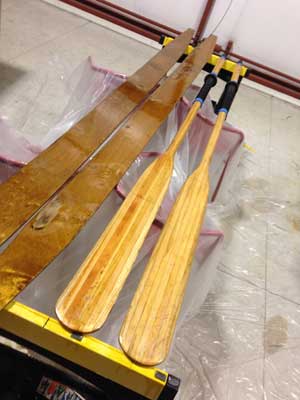
6. Lay down plastic drop-cloths and support the oars at the VERY ends so as to have access to as much wood as possible between coats .
7. An oil-based stain is optional here depending on how you want your oar to look. Use a paintbrush manufactured for use with oil-based coatings. Wait 2 hours for the stained oars to dry. Add additional coats will make for darker results. If you like the natural look move right on to varnishing.
8. Make sure to wash the brush with mineral spirits or paint thinner before using with varnish. It also helps if before you start to varnish you dip the brush lightly in the paint thinner. This helps spread the varnish out and makes it easier to clean the brush after you’re down.
9. Apply varnish with brush strokes in one direction, taking note to remove any brush hairs and making sure that no drips are sagging on the underside of oars. Less is more here…. Don’t try to make it perfect. Varnish is self-leveling, and over-brushing will make it look bad. Wait 24 hours before adding a second layer. Before doing so take 220 grit sand paper and give a very light once-over. Blow off and clean again with denatured alcohol. Repeat until you’re satisfied with how the oar looks.
10. Wait 24 hours from your last coat and go fish!
Video Hatch: “One Shirt: Pescador”
Smith Debuts New Dockside for ICAST/IFTD 2014


