Photos: The Fish Are the Heroes
Chester Allen photo
The classic big fish photo — a happy angler in a red shirt gripping a big, dripping trout and grinning at the camera — decorated fly-fishing magazine covers shot for decades.
So, anglers got used to taking their own hero shots during their fishing adventures.
Walk into any fly shop, and you’ll see sun-bleached shots of grinning anglers holding big trout pinned to the bulletin board.
Well, magazines now strive for more organic shots that show the fish by itself — or at least showing the fish in the water if it’s a hero shot.
These shots are far better — especially if you want to remember the fish as you saw it in the moment.
Portraits
A few years ago, I really got into taking portraits of special fish. A special fish can be that hulking brown trout that whacked a streamer stripped from the bank — or it can be that gorgeous 10-inch rainbow from a tiny mountain creek.
Smaller fish often make gorgeous photos, and they’re easier to work with than a monster.
That said, we usually want the photo of the big fish. I mean, that’s why you drove 400 miles and rigged up in a driving rainstorm, right?
So, what’s a fish portrait?
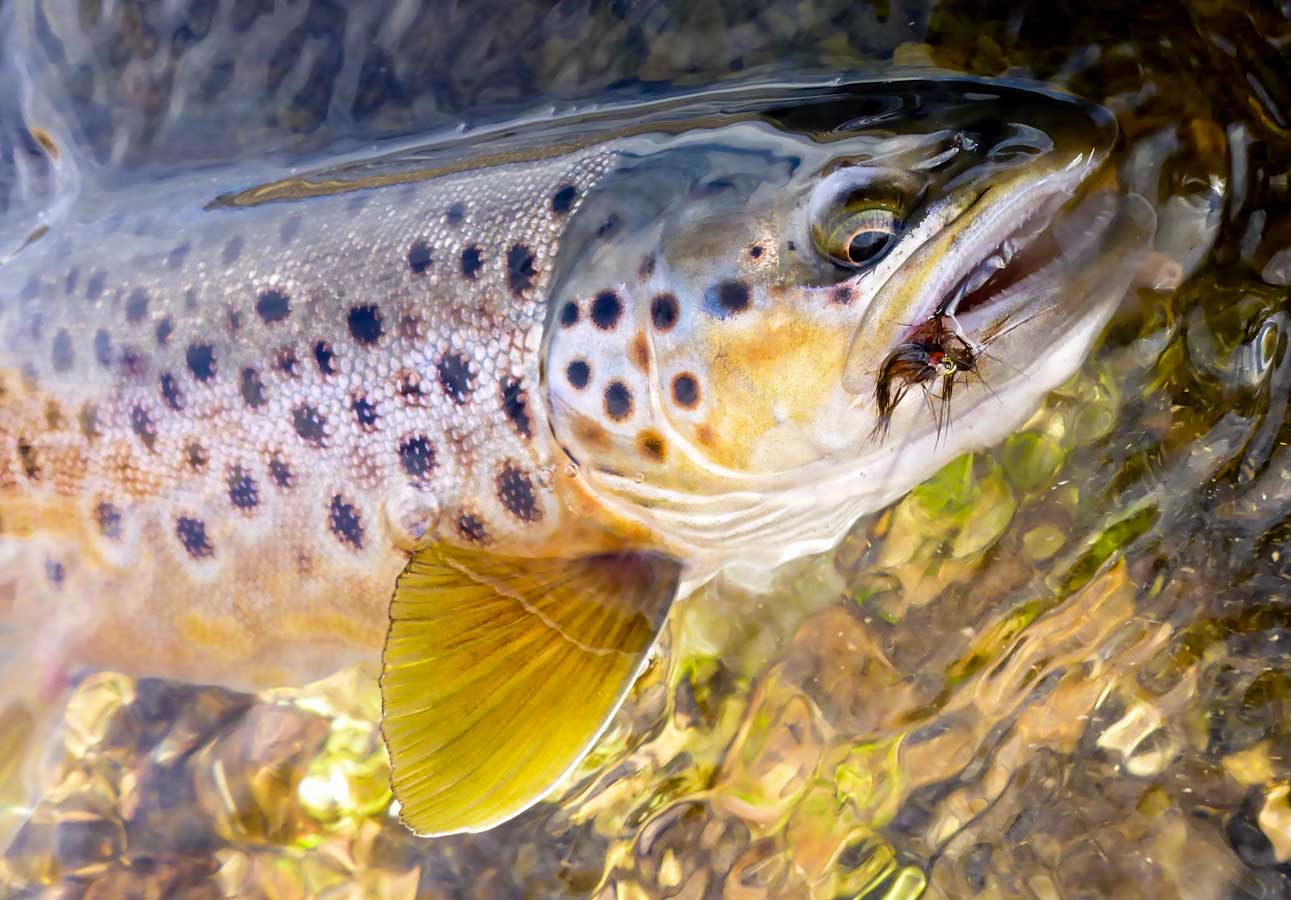
Well, it’s a shot that shows the fish in the water in an attractive way. For me, that usually means you don’t see any humans — or parts of humans.
The fish is always in the water.
Sometimes, I like to also capture the fly that caught the fish. I always try to shoot the fish against weedbeds or colorful rocks.
The right shot is far more beautiful — and meaningful — than a painted fiberglass replica. That said, if you want a painted fiberglass or carved wood replica, the artist will appreciate working with a nice, clear shot.
Sometimes, a portrait is the entire fish. Other times, it can be a close-up of the head — or even the tail.
Getting a clear shot of a living — often pissed-off — trout is difficult. Especially if you want to capture an interesting angle or sublime, glowing light.
That sublime glowing light — how a wet trout reflects light — is special. Recording it with a camera is hard, which is why so many fish shots just don’t jibe with your memory of the moment.
So, how can you do this? Let’s start with your gear.
A Lot or a Little
I carry two cameras on most trout adventures. One camera, a waterproof point-and-shoot, lives in the wader front pocket. I let the little cord loop dangle outside the pocket. Then I zip it closed.
Many of these tough, waterproof point-and-shoot cameras have a surprisingly good lens — especially if you use the micro setting. These cameras cost between $200 and $500. For the past three years, I’ve used a Panasonic Lumix DMC-FTS.
A also carry a Canon DSLR camera in the back of my old-school vest. I usually set it up with a Canon FE 50 mm lens with a polarized filter. This is a great, inexpensive lens. I also carry a Canon EF 16-35mm wide-angle lens. This lens can get a stunning close-up shot of the whole fish.
I use this DSLR camera if the fish is really spectacular.
I don’t put my best DSLR into my vest, as these babies are expensive — and are allergic to water. Right now, I’m shooting with a Canon EOS 50D. It would hurt to lose this camera, but it wouldn’t be the devastating blow of losing the more-advanced camera body I use to shoot wildlife and landscapes. I put the DSLR into a small dry bag before it goes in the back of my vest.
Always, always loop that strap over your head. With the point and shoot, loop the cord around your wrist.
I usually set my DSLR camera on a automatic preset, so I can uncap the lens, focus on the fish and rattle off more than 20 exposures in seconds, changing angles a few times. More on changing angles in a bit.
Gone in 60 Seconds
I limit myself to 60 seconds of shooting any fish. I count the seconds as I work. It’s amazing how much you can shoot in that amount of time. Think about this — a football play usually lasts less than 15 seconds.
This amount of time is good for two reasons:
First, most trout will stay pretty still for a minute or so before they rest up and want to swim away.
Second, I want the trout to live, so it’s very important to keep them wet, keep your hands off them and get them gone.
When I’m playing a pretty fish — okay, a damn big fish — I look for a nice spot to land the fish. My favorite spots are semi-submerged weedbeds, shallow, slower water near the bank or slower, 6-inch-deep water over pebbles. The water and weeds cushion the fish.
The water also provides that cool, glowing light.
Silty areas make for bad, cloudy shots, and that silt gets into the trout’s gills. Stay away from those areas.
I play my fish hard and fast. When it’s time for the photo, I grab the leader and glide the fish onto the semi-submerged weeds or in position in slower water. While I’m doing that, I’m pulling the camera out of my wader pocket.
I use the bigger DSLR when my partner is there to pull the camera out of my vest and take it out of the little dry bag.
Once I have the fish in the spot, I release the leader and start shooting. If I’m lucky, that trout will stay motionless for 30 seconds or so. If I’m unlucky, the trout will shake its head and break my leader before I even set up the shot.
This is why most of my best shots are of small fish — or of big fish hooked on streamers and hefty tippets. I get nice shots of spring-creek trout hooked on 5X or 6X, but luck comes into play here. It helps to get the fish on a semi-submerged weedbed, which seems to keep them calm for about 30 seconds or so.
I don’t play my fish to death just to get a photo. And, yeah, lots of fish don’t want to pose at all. If they struggle, I just let them go.
Remember to limit yourself to 60 seconds, not touching the fish and giving up if the trout isn’t willing.
Playing the Angles
Look at the fish for a second. Is the light soft and indirect? Does the water glow around the fish? Cool! Fill the frame with the fish — or the part of the fish you want to remember. Usually focusing on the trout’s eye makes a good image. Shoot a few shots. If you’re using a DSLR, you can rattle off several images a second.
I often use the “Sports” preset on my DSLR, as I can get many images in just a few seconds, and the camera will often keep the fish in focus if it moves a little.
Sometimes you get lucky, and the fish will move in an interesting way all by itself.
A few years ago, I landed a big brown trout on Yellowstone National Park’s Madison River. I took a few shots with my DSLR. I left my camera strap around my neck while the fish swam away. Suddenly the fish turned in the water, half submerged, and stopped to glare at me for a few seconds — right next to my rod. I grabbed the camera and rattled off a few shots. None of the shots turned out perfectly, but one image of that fearless trout is now my favorite fish shot.
After you get a few images, try placing your camera at different angles to the fish. I like placing my camera low to the water at the fish’s head and shooting down the body to the tail.
I also like close-up shots of the head. Sometimes I shoot from the tail up.
Other times I just slightly shift the camera angle, which sometimes captures a halo of light around the trout. I love shots taken from above — a bird’s eye view of the fish holding in the water — but these are hard to take.
Remember to keep your shadow out of the photo, even if you’re shooting with the sun at your back. Also remember to fill the frame.
Cloudy days or times of low light, such as early in the morning or later in the afternoon, will give you the best soft, natural light. It’s possible to take a nice photo at high noon, but this will probably require a polarized filter on a DSLR. I keep the filter on the camera all the time because it’s easier to quickly take the filter off than to put it on. I lose at least one polarized filter each year — just from the chaos of shooting a big fish in a few seconds.
Taking It All Home
When you download your photos, you’re in for some disappointment. Most of your shots will be flawed in some way. But some will blow you away.
Over time, more and more of your shots will make you dizzy.
When I first started taking portraits of trout, I realized I needed to practice this whole drill. So, I spent a lot of time at the local bluegill pond. Those little fish came quickly to my flies, and I got lots of practice taking fish portraits.
All that practice paid off on the trout stream.
Keep your best shots on a memory stick — or on a dedicated file on your computer.
When you have time, go over the shots and make notes on how they could have been better.
The best of the best will make your heart sing.
Those are the shots I take to my local pro photo shop, where they make prints. Sometimes I have prints made on glass or metal plates. Those prints go on the wall of my office/library/fly tying room.
Those portraits of beautiful fish aglow in clear water — looking like they did when they made your heart hammer in your chest — are memories captured forever.
Remember, the special fish of your life always look best when humans aren’t in the shot. The fish are always the heroes — not you.


